

8 Easy DIY Christmas Decoration Ideas You Should Try
The holidays are just around the corner, and it’s time to bring on the holiday cheer. Luckily, you don’t have to break the bank for expensive, store-bought decorations, as there are relatively easy, DIY Christmas decors that you can make at home.
Bring out the dun Christmas spirit as you get started with these fun DIY options that will make the holiday season merry and bright.
Whether it’s making simple centerpieces, crafty holiday wreaths, DIY ornaments and other Christmas decorations, we’ve all got you covered.
Snowflakes made out of Popsicle Sticks
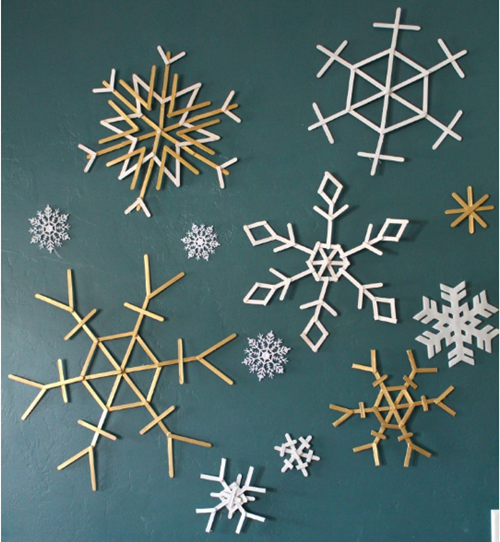
Source: Sugar Bee Crafts
Making popsicle sticks snowflakes are a fantastic Christmas decor that you can make if you have kids. If you’re lucky, they will be compelled to put down their devices to whip up some snowflakes made of popsicle sticks!
Here’s how you can make one:
- Lay out your designs and hot glue them after.
- Run the glue over it and place the sticks down (tacky glue can be used as well.)
- You have the option to paint them after you’re done.
- Add a cute ribbon to twine around it, and hang on the door for a finishing touch.
Patterned Paper Ornaments
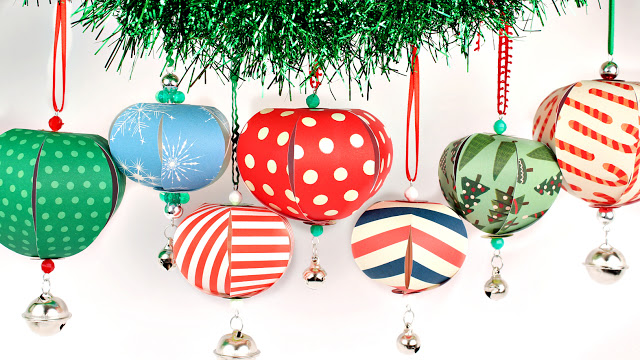
Source: Make Your Mark
Another Christmas decor that you can make out of scratch are colorfully patterned paper ornaments. They’re a great way to an excellent addition to your home during the holiday season. You can also enlarge the pattern and come up with different sizes. It’s super fun to make, and the kiddos will love making these!
Here’s what you need:
- Straws and wires
- Beads, palettes, and bells
- Straws and wires
- Large safety pin
- Needle nose pliers
- Christmas scrapbook paper
Now here’s how you can create your own:
- Trace the pattern on the card then cut.
- Poke holes on the center using a large safety pin, usually at the end of each petal at the very center of the two paillettes.
- Cut wire at least 6″ long, then bed a loop at the end.
- Cut drinking straws to at least 2 1/4″ long.
- Thread a bead, then a paillette — also, the center of the cut paper pattern side, usually the one facing the bead and paillette.
- Add the straw.
- Carefully thread the tip of each petal on the wire.
- Add another paillette and bead. Then, cut and bend another loop as well, to secure it.
- Finish with a ribbon on one end and a bell on the other.
Hand-Lettered Ornaments
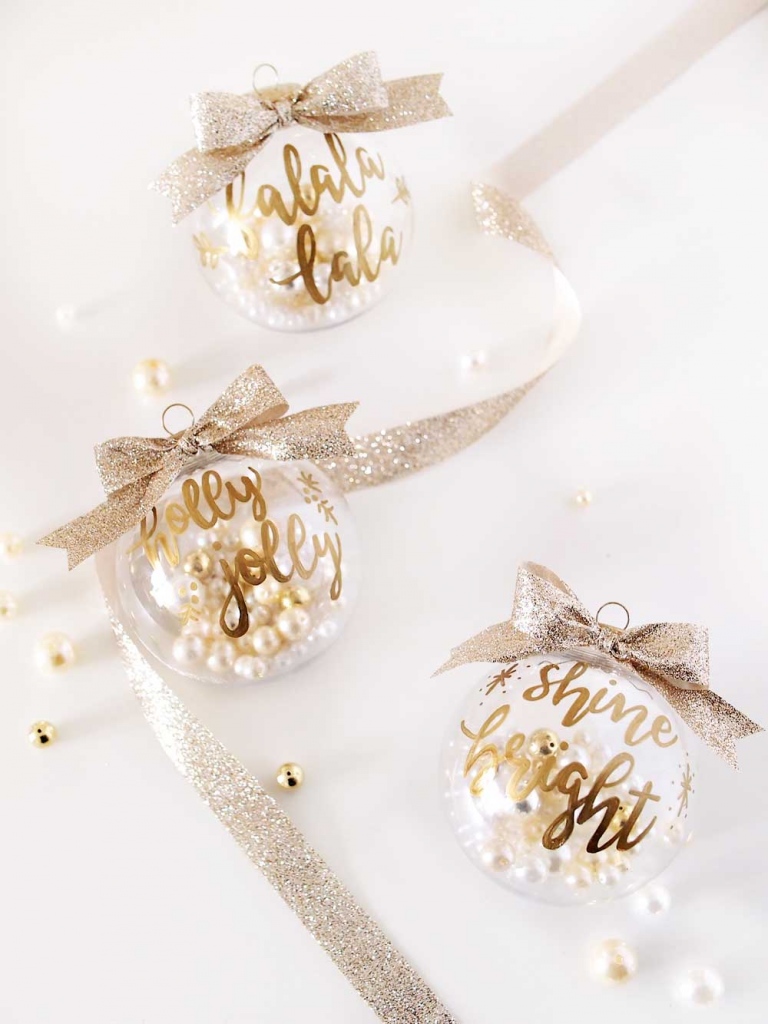
Source: Tings and Things
A hand-lettered Christmas ornament is fantastic to hang on the Christmas tree. It can also be a personalized gift to someone this holiday season.
Here’s what you need:
- Gold spray paint
- Pearls
- Needle
- Plastic/Glass Ornament Globes
- My Template
- Oil-based Sharpie in gold
Now here’s how you can create your own:
- Spray the lid and hanger with a gold spray paint. Let it dry for a couple of minutes.
- Start hand-lettering to the globes.
- Cut out each square template and insert each of them on the globe.
- Trace each letter with a sharpie.
- Insert the pearls on the globes.
- Put a perfect ribbon on top of the globe.
Kusudama (Paper Flowers)
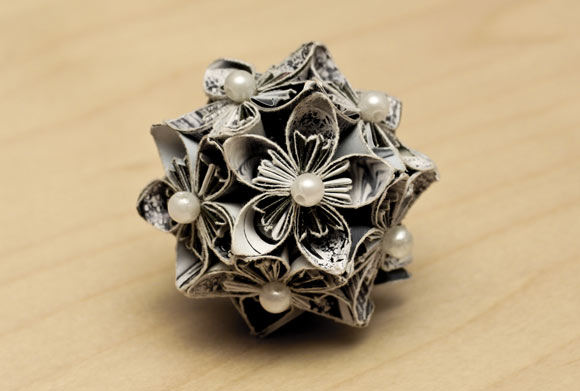
Source: Craftuts
This next decor idea uses the art of paper folding or commonly known as “Origami”. You can find so many cool origami tutorials online. Looking at the picture you’re thinking that this is complex to do, but it isn’t. This would make a great decoration on your table, or you can hang it from your ceiling by putting it on a string. Just follow the steps below to create your own Kusudama.
The tools and materials you’ll need are:
- Paper (60 pieces of paper with the same size; 5 pieces for every flower)
- Ruler
- Pencil
- Glue
- Scissors
- Paper clips
- Beads (optional)
Now here’s how you can make your own:
- Collect five pieces of paper. Each piece = 1 petal. Fold each paper diagonally to create a triangle.
- Fold both corners to the middle to form a square.
- Fold the corners down to meet the edge of the paper.
- Flatten the flaps created in the previous step.
- Fold the left corner in to meet the first side crease. Repeat it on the other side and then glue your flower petal together. Repeat until you have six petals.
- Glue the petals altogether to form your kusudama origami flower. For better results, use a glue stick or liquid glue, and then let each connection dry first before continuing on gluing the other petals. You can use paper clips to hold them together.
- You can add extra embellishment to your flower by attaching beads on the center.
Advent Calendar
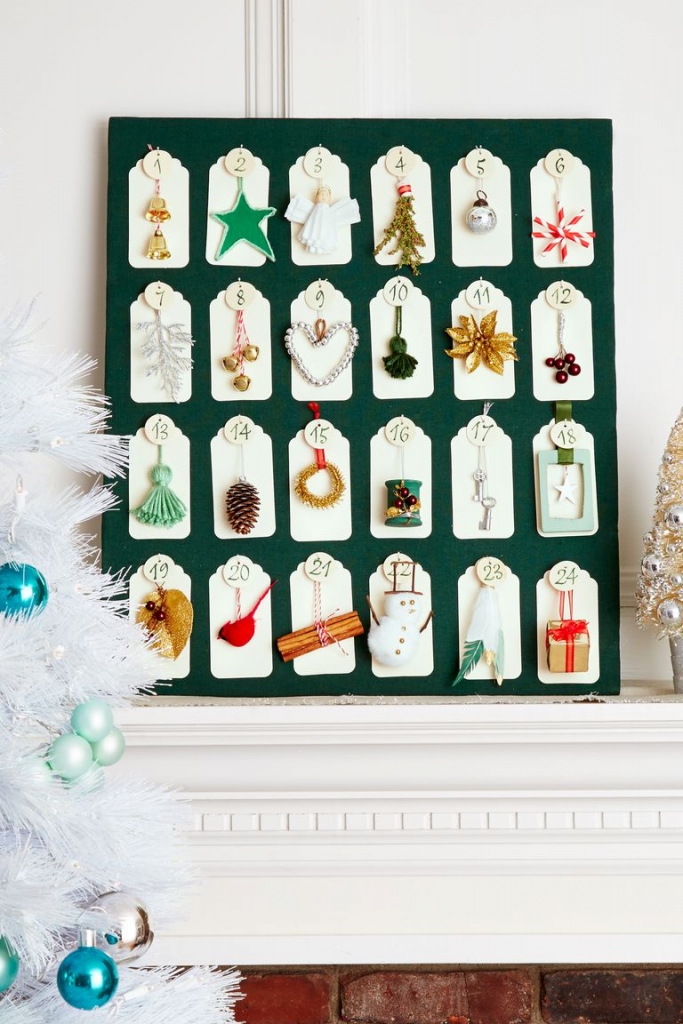
Source: Erica Lapresto
Decorate your Christmas tree one day at a time and make a countdown until Christmas with a lovely advent calendar. Wrap a 21″ x 24″ foam board in fabric. Then secure the back with hot glue. Now, you can hang store-bought tags in rows as you add your ornaments.
You can mark each date, stamp numbers, and hang the ornaments on it. That way, you’ll know which decorations are ready for the tree later on.
Color Blocked Wood Christmas Card Holder
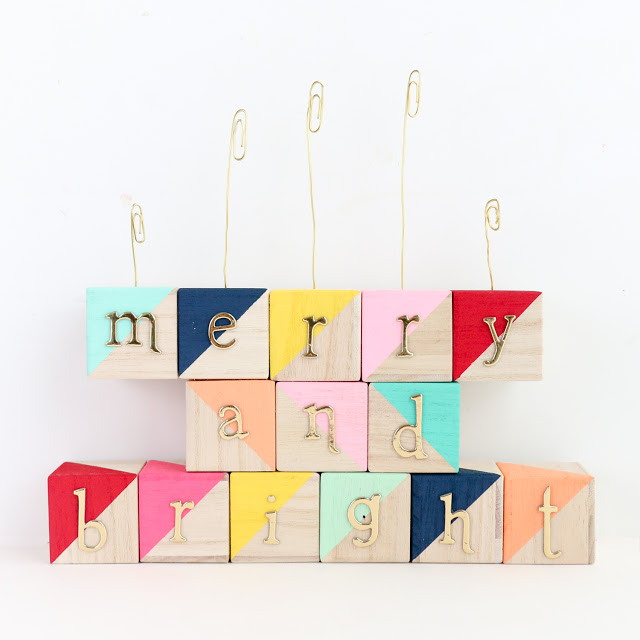
Source: A Kailo Chic Life
Want a cool way to hang all those Christmas cards once they come in from the mail, that way, they won’t up stacked on the fridge? Then, DIY Christmas card holders are an excellent touch for your home during the holidays.
Here’s what you need:
- Wood Craft Blocks
- Acrylic Craft Paint
- Painter’s Tape
- Paint Brush
- Gold Sticker Letters
- Brass Jewelry Wires
- Pliers
- Thumb Tack
Now here’s how you can create your own:
- Tape one corner of the wood using a painter’s tape, then paint the remaining corners of each block.
- Paint it dry and remove.
- Use letter stickers to spell out words on the blocks.
- Take out the pliers and brass jewelry line, and bend it on a paper clip shape.
- Use a thumbtack to punch out a hole in the block and insert the brass paper clip on it.
Ribbon Christmas Wreath
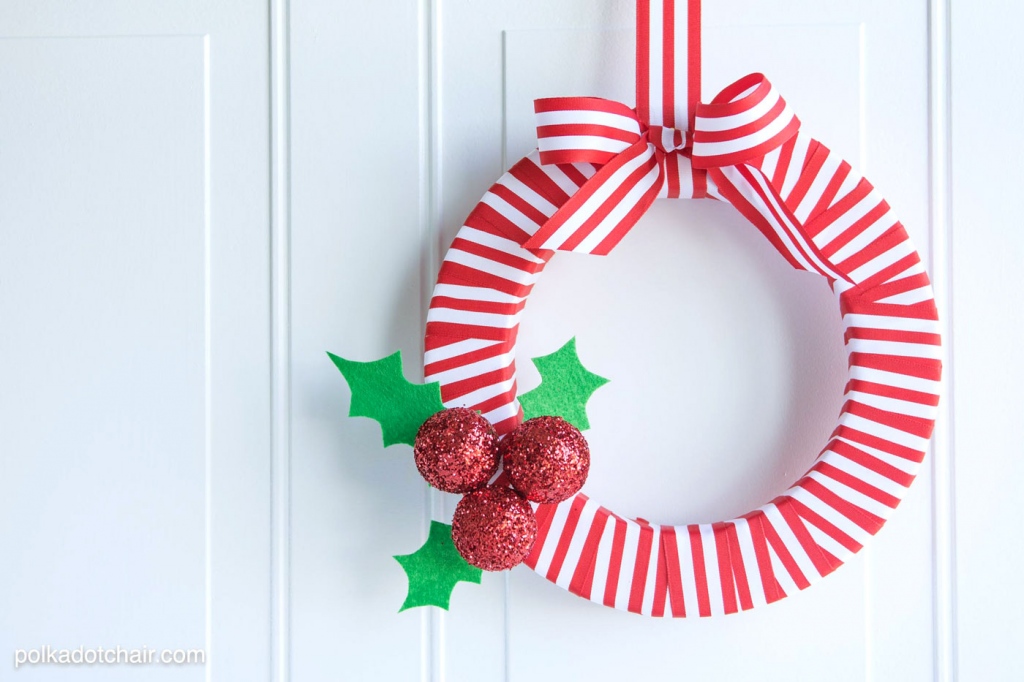
Source: Polkadot Chair
When it comes to decorating your home for the holidays, the exterior of your home is equally important as in the inside. A DIY Christmas wreath will be a welcome addition to add a more festive touch in your home.
Here’s what you need:
- 12″ Make it Fun Foam Wreath Form
- 3, 2″ Styrofoam Balls
- 1 sheet stiff felt
- Red Paint and glitter
- Styrofoam Glue
- Toothpicks and T Pins
- 1 1/2″ wide Striped Ribbon
Now here’s how you can create your own:
- Wrap the wreath form with a ribbon.
- Use a pin to attach the ribbon from start to end carefully.
- Print out holiday templates. Then, trace and cut them on the green felt.
- Make fun foam balls by coating it with glue then covering them with glitter.
- Let the balls dry and attach it on the wreath.
- Place an extra ribbon on the wreath and voila! You’re done.
Felt Garland
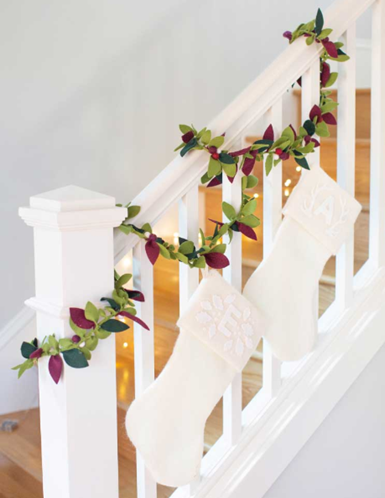
Source: Lia Griffith
If you want a felt greenery garland hanging on your staircase then, you can make one. It’s gorgeous and quite simple to make, too.
Here’s what you need:
- Cricut Maker or Scissors
- Needle-Nose Pliers/Wire Cutters
- Low-Temp Hot Glue Gun
- 18-Gauge Silver Wire
- Felt
Here’s how you can make one:
- Gather all materials and tools.
- Cut the felt according to the template.
- Measure how long you want your garland to be then, cut the wire.
- Glue the wire on the very middle of each leaf strand, then connect multiple strands to cover the wire.
- Fold each leaf strand in half over the wire, and attach it with hot glue.


Leaver your comment